Setup Staff Bios
We have found it helpful to set up webpages with staff bios with a picture and brief bio of each staff member.
Purpose:
- to help the course staff (instructor, TAs, LAs) get to know each other.
- to help students feel comfortable attending labs and office.
See these example sites for the example bios and the info that you can include:
You can use these as an inspiration to write your bio and select a picture that you’d like to share with students.
Technical Steps
Step 1: Log into your GitHub account.
If you don’t have a GitHub account yet click the ▶ character at left for instructions on creating one
You will need a GitHub account; you can sign up for one at https://github.com on the free plan. (You may also like to get the GitHub Student Developer Pack at https://education.github.com/pack but you won’t need that to create your bio.)
If you need basic background on git/GitHub click the ▶ character at left
Version Control
First, a bit of background.
git and GitHub are two of the currently popular tools to keep track of the changes in text-based files.
What’s the difference between git and GitHub?
A lot of times you’ll hear people use these terms interchangeably but that’s not entirely correct.
git runs locally on your computer and keeps track of the changes that you make to the files on your machine. You won’t be able to share these changes with your teammates using git alone, and that’s where GitHub comes in.
GitHub is a web service, a “cloud” platform that hosts your projects in repositories and allows you to share your repos with the world. There are alternative solutions to GitHub, such as GitLab and BitBucket, but they are all designed to let you push your local changes to the cloud to enable backup, sharing, and collaboration.
Basic git/GitHub references and tutorials
Here’s a GitHub Basics Tutorial - How to Use GitHub https://youtube.com/watch?v=x0EYpi38Yp4 to get you started.
You might also find it useful to look over the Git Tutorial: Get Started with Version Control and Command Line Tutorial: Usage in Linux and macOS by Tania Rascia.
These visual guides might also be helpful in exposing what’s going on behind each git command you run:
- A Grip On Git (A Simple, Visual Git Tutorial) https://agripongit.vincenttunru.com
- Version Control with Git https://zuckermanbrain.github.io/git-novice
- A Visual Git Reference https://marklodato.github.io/visual-git-guide/index-en.html
Step 2: Locate the repo for your course’s website
The repo for your course’s website will be under the ucsb-csw8 github organization, and probably has a name that follows the naming conventions shown here:
| Quarter | Repo Name | Link |
|---|---|---|
| Winter 2022 | w22 | https://github.com/ucsb-csw8/w22 |
| Spring 2022 | s22 | https://github.com/ucsb-csw8/s22 |
| Summer 2022 (Kharitonova) | m22-ykk | https://ucsb-csw8.github.io/m22-ykk/ |
| Summer 2022 (Elsayed) | m22-shereen | https://ucsb-csw8.github.io/m22-shereen/ |
| Winter 2023 (Conrad) | w22c | https://github.com/ucsb-csw8/w23c |
| Winter 2023 (Kharitonova) | w22k | https://github.com/ucsb-csw8/w23k |
Step 3: Create a fork
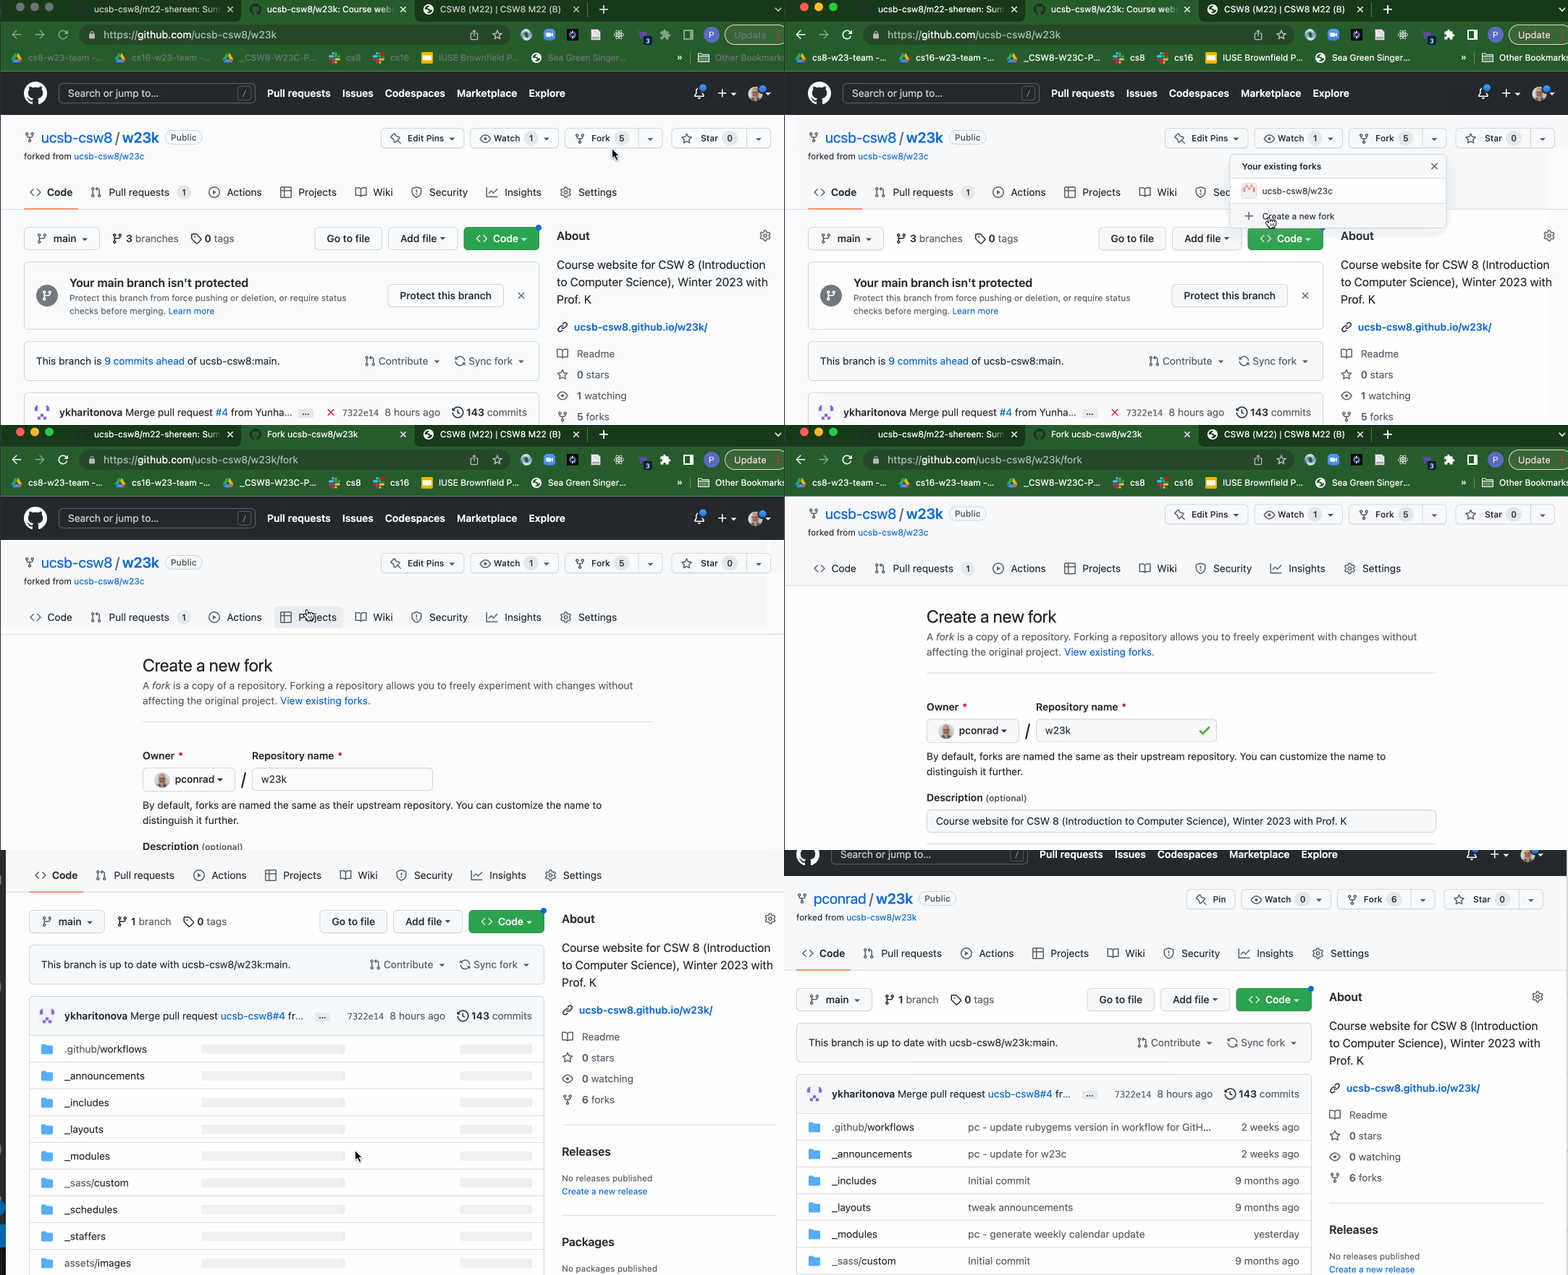
Create a forked copy of the course website repo under your own GitHub account.
If aren’t familiar with how to ‘fork a repo’ click the ▶ character at left to open this section and learn more.
Navigate to the course repo. In the instructions below, I’m showing the interface for the w23k repo. Then, as shown in the animation below, click on the button at the upper right labeled “Fork” and proceed to create a fork of the repo under your own github id (the owner will show as your GitHub id, e.g. pconrad in the animation shown below.)

You have now created a fork of the original repo (e.g. github.com/pconrad/w23k or github.com/cgaucho/w23c).
What happens next is that you’ll make changes in your forked copy, then do what’s called a Pull Request back to the original course website repo.
Step 4: Make Changes in the Forked Copy to add your own Bio
You can now make changes to the forked copy to add your own bio. The most straightforward way to do that, if you haven’t worked with git/GitHub before, is to do this through the GitHub web interface; but if you are comfortable with Git/GitHub, you may do it using git at the command line.
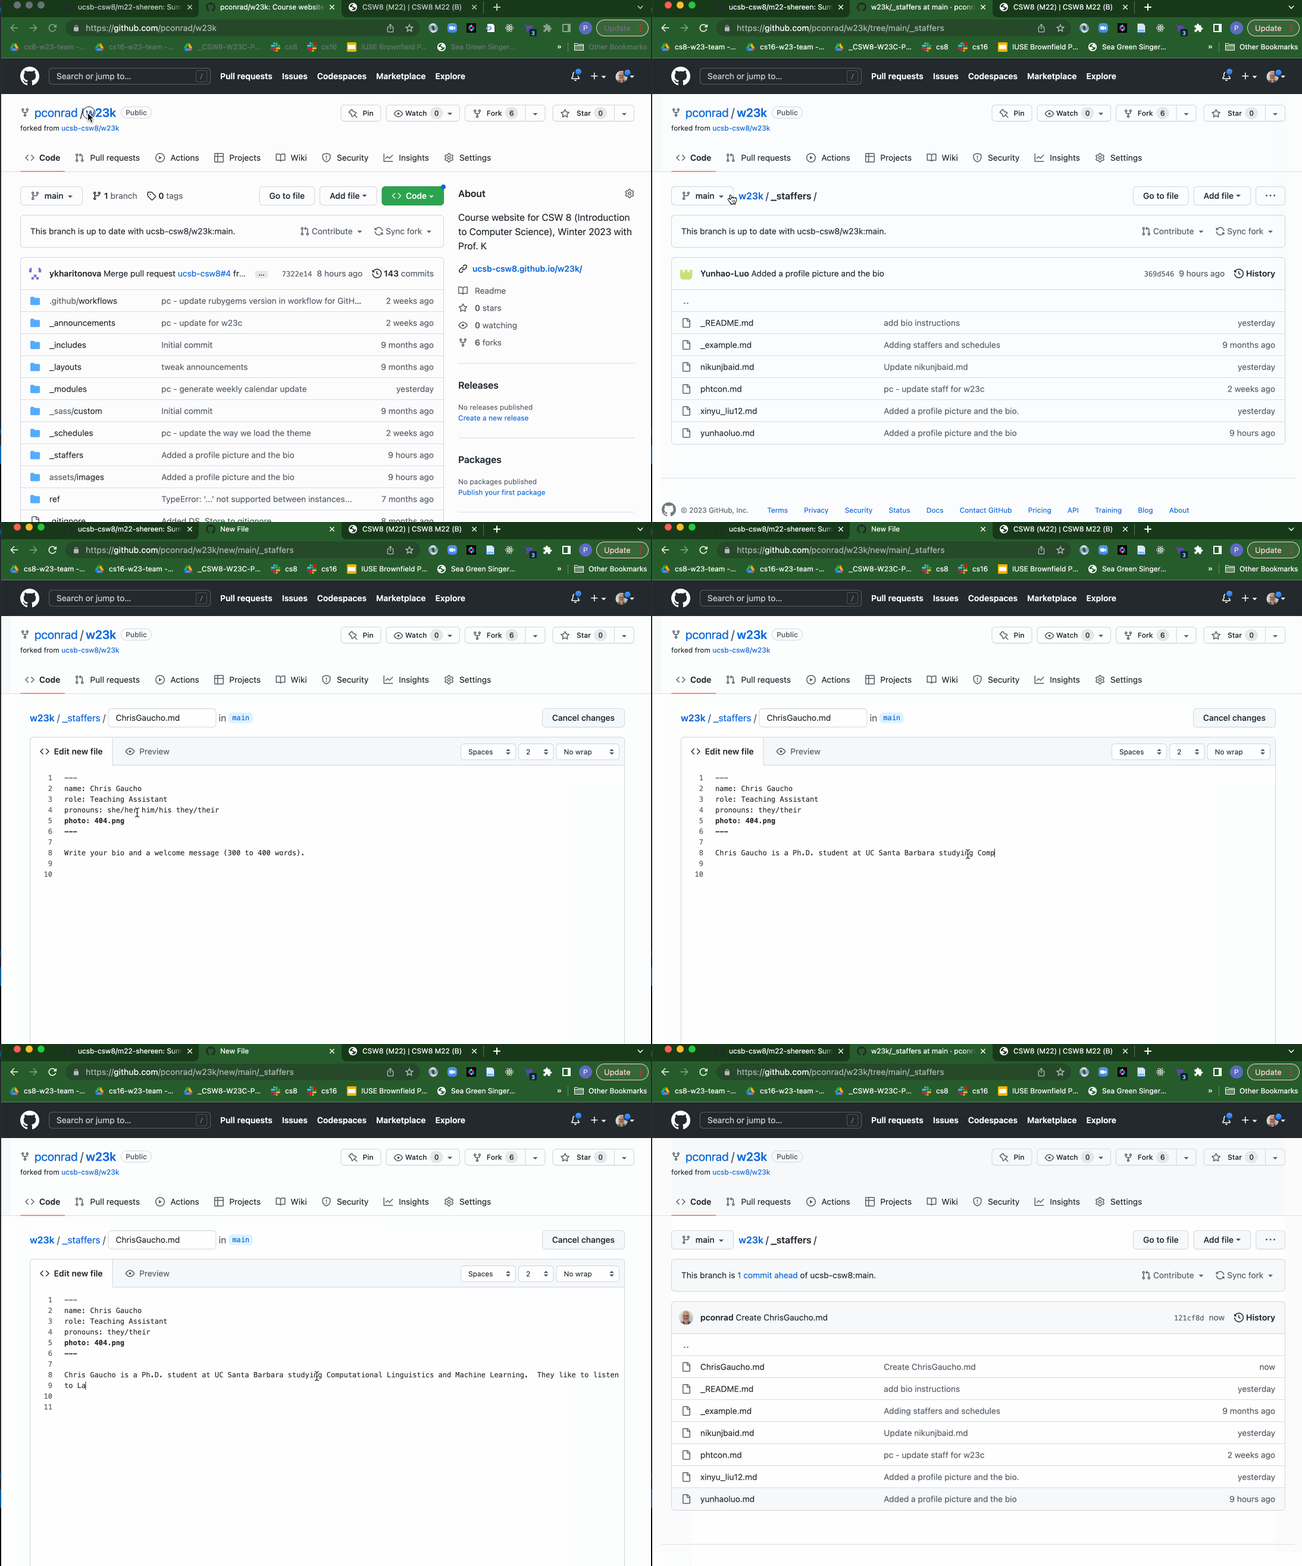
Under the directory _staffers add a file with your name as the filename, and .md as the file extension, for example ChrisGaucho.md. The contents of this file should be similar to those in _example.md (or the other examples files shown.)
If aren’t familiar with how to make changes using GitHub, click the ▶ character at left to open this section and you’ll see an animation and explanation.
Follow these steps as illustrated in the animation below
- Navigate to the website, and click on the directory
_staffers - Click on the
_example.mdfile and then click the pencil icon to edit it. - Copy the contents, and then cancel out of edit mode.
- Click to add a new file, and call the file
ChrisGaucho.md(or whatever your name is followed by.md) - Paste in the contents from
_example.md - Edit to change it to your own content.

Step 5: Optional, but encouraged: Upload a photo
If you really don’t want to have a photo on the website, you can leave the line from _example.md that looks like this:
photo: 404.png
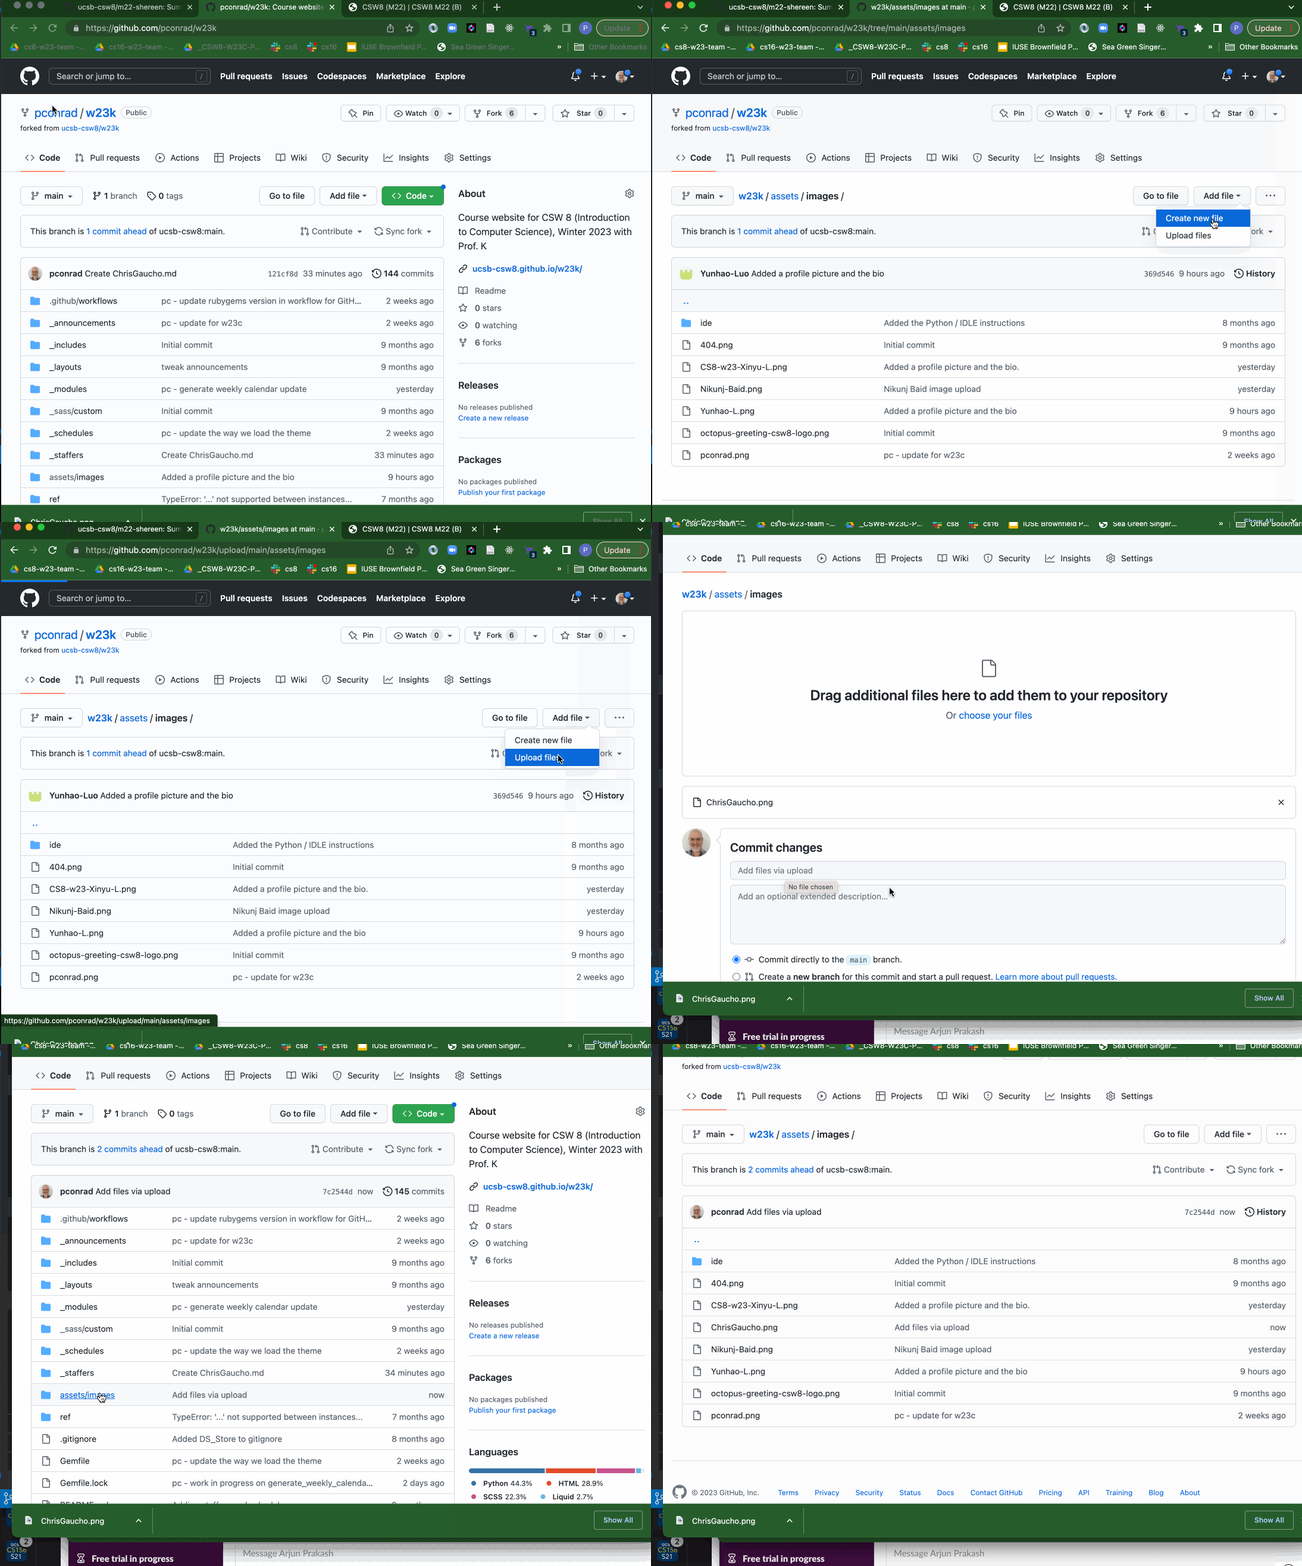
However, we encourage you instead to upload a photo into the directory assets/images.
- Use an image that shows your face and helps students recognize you.
- Use a square PNG image (300x300 px max resolution).
- Call it
YourName.png, e.g.ChrisGaucho.png
If you aren’t sure how click the ▶ character at left to open this section and you’ll see an animation and explanation.
Follow these steps as illustrated in the animation below
- Have a file called YourName.png somewhere on your hard drive
- Navigate to your forked repo
- Click on the
assets/imagesdirectory - Click Upload Files
- Locate the YourName.png file
- Scroll down and click “Commit Changes”

Step 6: Submit a pull request
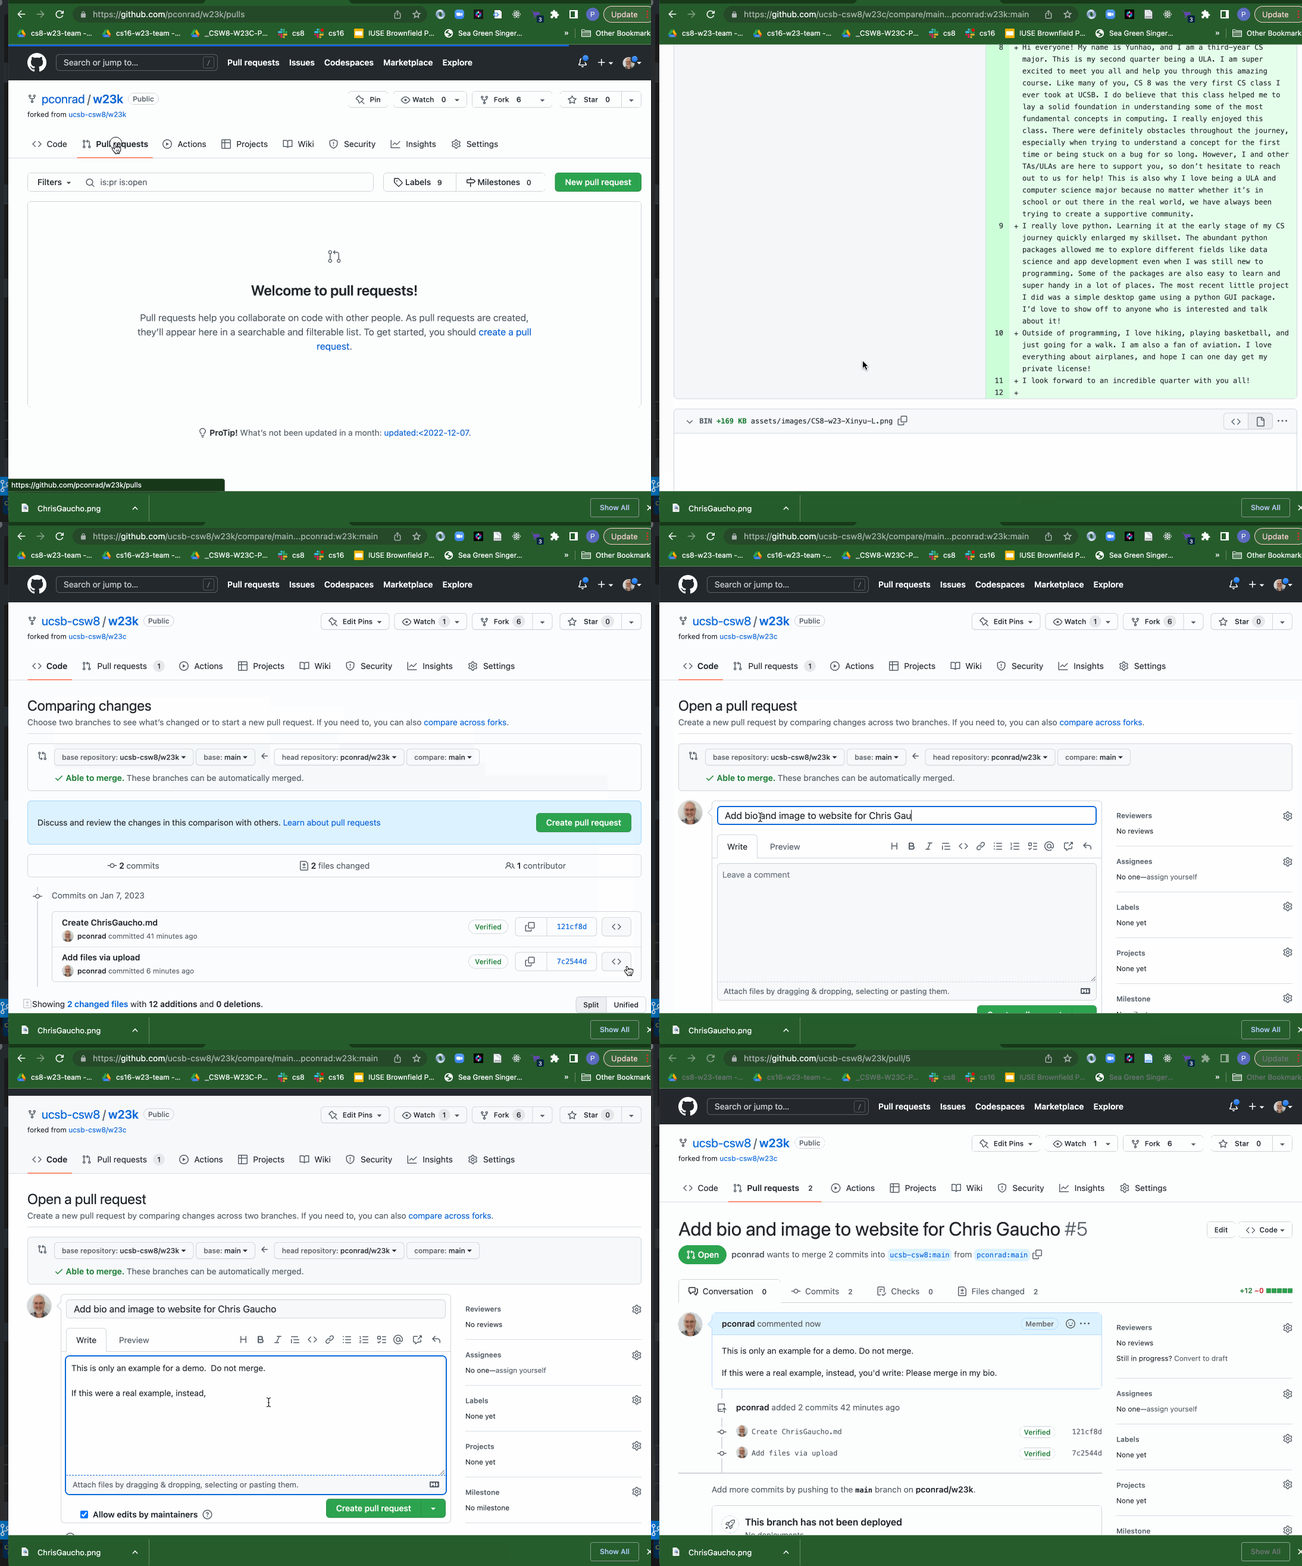
Now submit a pull request from your forked copy to the original repo. The pull request, if done properly should show only that the files changes are the addition of your photo under assets/images, and the addition of the .md file for your bio under _staffers.
Be sure that the base repo shown is the one for your course; if that one was forked from another repo, the default might be that earlier repo instead of the one you want, so you might need to change it.
If you aren’t sure what a pull request is, or how to submit one click the ▶ character at left to open this section and you’ll see an animation and explanation.
You now have a forked copy of the course website with your changes. The next step is to request that the person in charge of the course website (typically the instructor, or possibly one of the course staff) does a pull to pull your changes from the forked copy into the official copy of the repo for the course website.
This is done through what is called a pull request.
To submit a pull request:
- Navigate to the web page for the original repo.
- Click the Pull Requests tab, then the green
New Pull Requestbutton at upper right. - You want the base repository to be the one in the
ucsb-csw8organization for your course and you want the head repository to be your fork.- In the example animation below, at first the base repo shows
w23cinstead ofw23k. That’s becausew23kwas forked fromw23c, so by default, the pull request is going to the top of the fork tree. We have to manually selectw23kif that’s the repo we want. - The arrow should show the direction in which the changes are flowing, from your fork to the main repo.
- Sometimes you may need to toggle the
compare across forkslink to get the proper options to show up.
- In the example animation below, at first the base repo shows
- Click the green
Create Pull Requestbutton again. - Verify that the changes shown are the ones you want (i.e. just your new bio and the new image).
- Fill in a commit message and an optional longer description as shown in the animation.
- Copy the URL for the pull request; we’ll send a message with that URL in the next step.

Step 7: Notify your instructor (or whomever they designated)
Now that you have a pull request, there will be a URL for that pull request, e.g.
Through whatever means your instructor advised (email, slack, etc.) let them know that you’ve made your pull request, and send them the url to the pull request.
And that’s it!
For attribution, please keep the reference to the author:
Content developed and released under the CC BY 4.0 by Yekaterina Kharitonova.
If you would like us to add or correct anything in these instructions, feel free to use the edit this page on GitHub link below and then submit a Pull Request from your forked repo.
Acknowledgement
Developed by Yekaterina Kharitonova and edited by Phill Conrad